We continue our examination of DK glyphs this week by dissecting all the major glyphs at our disposal. Remember, I have used a highly scientific measuring system, by which I mean I picked my favorites and gave them all correspondingly good letter grades (A, B, or C; no pluses or minuses) based on their application in PvE DPS, PvP, and PvE Tanking.
Glyph of Anti-Magic Shell
PvE DPS Grade: C; PvP Grade: A; PvE Tank Grade: A
An extra 2 seconds on one of the DK's chief resistance abilities is a solid addition to your glyph page, if you anticipate taking a lot of magical damage. Thus, tanks and arena fighters will probably find it very useful, while support DPS will probably want to skip this one.
Glyph of Blood Boil
PvE DPS Grade: A; PvP Grade: A in BGs, B in Arena; Tank Grade: B
For those DKs who love facing off against large collections of trash mobs in dungeons, or running BGs with groups of opponents, this glyph is outstanding, adding more versatility to your basic AoE attack. Its usefulness is in direct correlation to how many mobs you'll be fighting however; arena players will want to think twice before taking this one on, though tanks may find it gives them an extra method of keeping unruly mobs in line.
Glyph of Blood Strike (Highly contingent on above glyph)
See above.
This glyph should really only be taken if you invest in Glyph of Blood Boil (unless you run dungeons with a troop of Frost mages). Bottom line: if you want to slow your targets, this glyph will help you bring them down all the faster.
Glyph of Bone Shield (Unholy Tree Only)
PvE DPS Grade: C; PvP Grade: A; PvE Tank Grade: A
This glyph is all about survivability. And the two areas where DKs need it most are arenas and when tanking. In both cases, this glyph is one an Unholy DK should strongly consider.
Glyph of Chains of Ice
PvE DPS Grade: B; PvP Grade: A; PvE Tank Grade: B
It never hurts to deal some damage when you slow those pesky escaping enemies. But in the current game where level 80 toons can only have 3 major glyphs, anyone who is not heavily into PvP may find this glyph too limited for everyday use.
Glyph of Dark Command
PvE Tank Grade: B
Only a tank should bother with this glyph. And most often, a MT won't need to rely on Dark Command to keep enemies in line. Taking this glyph does help to ensure that if a mob escapes you can get them back to you all the faster, but maybe it's a better choice for OTs instead.
Glyph of Death and Decay
PvP Grade: B; PvE Tank Grade: A
DKs tank by doing DPS, and the more damage they put out the better they are at holding aggro. This glyph makes it all the easier to keep mobs where they should be. And the occasional black sheep PvPer may like it as a means of more effectively routing grouped enemies.
Glyph of Death Grip
PvP Grade: A; PvE Tank Grade: A
Take this glyph any time you anticipate a need to pull mobs/enemy players quickly and efficiently. Players in WSG or AV will most likely get the most out of this glyph, but any PvPer can put it to good use. Tanks may also find it helpful in timed instance runs, like Heroic Culling of Stratholme.
Glyph of Death Strike
Grade for all instances: A
Any time you need to heal yourself, this glyph will help out. It will help even more when used as a "panic button" in high-damage or lengthy fights, and is a great way to keep healers from having to focus on non-tanking DKs.
Glyph of Frost Strike (Frost Tree Only)
Grade for all instances: B
This glyph is a time-saver, allowing you to put out more damage while expending less runic power (always a plus if you're saving up for a big cooldown ability). Simple as.
Glyph of the Ghoul (Unholy-friendly)
Grade in all instances: A
A major complaint of Unholy DKs is how easily our ghouls perish when caught in the crossfire. This glyph significantly buffs ghoul longevity, which everyone can appreciate.
Glyph of Icebound Fortitude
PvE DPS Grade: B; PvP Grade: A; PvE Tank Grade: A
Waiting to get enough runic power for Icebound Fortitude to activate has caused many a DK to take unnecessary damage. On the flip side, some may argue that 20 runic power isn't a lot to spend.
Glyph of Icy Touch
PvE DPS Grade: B; PvP Grade: B; PvE Tank Grade: A
Everyone uses Icy Touch, and this glyph sets you up with a healthy dose of runic power right off the bat. Highly useful for tanks who prefer pulling with Icy Touch.
Glyph of Plague Strike
Grade in all instances: B
This glyph isn't fancy, but Plague Strike is part of pretty much every DK's rotation, adding some decent damage to each fight. A solid, if unimaginative choice.
Glyph of Obliterate (Frost-friendly)
Grade in all instances: B
While not Frost exclusive, Obliterate is less friendly to those DKs without Annihiliation. Still, this glyph poses a good damage buff for those able to compensate for it.
Glyph of Rune Strike
PvP Grade: B; PvE Tank Grade: B
The damage increase is good, but the fact remains that Rune Strike is a situational ability; filling a slot with this glyph may not suit everyone. And PvE DPSers should stay away because of the ability's high threat generation.
Glyph of Rune Tap (Blood Tree Only)
PvE DPS Grade: A; PvP Grade: B; PvE Tank Grade: A
Dungeons and raids are where this glyph really shines - a group heal effect is never frowned upon, especially among single-target healers like paladins.
Glyph of Scourge Strike (Unholy Tree Only)
Grade in all instances: A
Perhaps more than any other tree, Unholy relies on diseases to get the job done ("the job" being, of course, reducing your enemies to a puddle of bones and goo at your feet). This glyph helps to ensure that your diseases are always up, and can cut down on rotation time also.
Glyph of Strangulate
PvE DPS Grade: B; PvP Grade: A; PvE Tank Grade: C
This glyph looks tailor-made for arena fights against casters. Most mana-based classes have abilities which allow for melee kiting, and this ability is a nice counter-attack to Blink, Fear, or Disengage. It application in PvE is weaker however, and tanks especially shouldn't waste time with this one.
Glyph of Unbreakable Armor (Frost Tree Only)
PvE DPS Grade: C; PvP Grade: A; PvE Tank Grade: A
An increase in armor is critical for hard-hitting bosses and melee fighters, and this glyph is a good one to take in both situations. Since the goal of DPS support in PvE is not to be hit all that often, this one is probably not all that useful.
Glyph of Vampiric Blood (Blood Tree Only)
PvE DPS Grade: B; PvP Grade: A; PvE Tank grade: A
In situations where healing over time is a must, this glyph is a good friend to Blood DKs. Again, not as useful to DPS support classes, but this glyph may be worthwhile anyway for its utility, at least until dual specs come out.
Showing posts with label PvP. Show all posts
Showing posts with label PvP. Show all posts
Monday, February 23, 2009

Wednesday, February 18, 2009
A Guide to DK Glyphs, Part One: Free Ghouls For Everyone!

Who doesn't love a good ghoul?
Once your death knight has completed the long slogging trek that is leveling and reached level 80, you likely have a number of things to cross off your list to make them ready for what lies ahead. There's gear to be purchased/made/picked up in dungeons, and PvP to be won for that all-important resilience gear. There is an epic flyer to save up for, and daily quests to be done. And now, with patch 3.1 waiting in the wings, every death knight needs to be thinking long and hard about their dual specs. But in all the hubbub that ensues after your DK's final ding, make sure you don't forget about your glyphs!
I'll start part one of my glyph analysis by taking a look at the minor glyphs available to DKs. In part two, which is forthcoming, I'll be discussing the plethora of major glyphs we have at our disposal. Remember, at level 80 you've got three minor glyph slots and three major glyph slots to play with, so go wild and have fun!
In a purely scientific evaluation system (a.k.a. choosing which one sounds the coolest or is most useful to me personally) I have given each glyph a letter grade which corresponds to how well I think it meets the need of three basic DK capacities: PvE DPS, PvP, and PvE Tanking. Where applicable, I have also identified whether a glyph is useful only to a particular DK talent tree (Blood, Frost or Unholy), as some glyphs deal with talent-specific abilities. Edit as of 2/23: I have eliminated the pluses and minuses from my letter grade system, to make it less subjective.
Saving Time: an Examination of DK Minor Glyphs.
Glyph of Corpse Explosion (Unholy Tree Only)
PvE DPS Grade: A; PvP Grade: A for BGs, C for Arena; PvE Tanking Grade: B
Basically, if you're the type of DK who likes playing in situations with multiple targets, this is the glyph for you. Most dungeons these days come packed with trash mobs, adds, or multiple bosses, and this glyph is a key way to make you effective at dealing AoE damage to trash mobs. Same for BGs. But, for arena players, this glyph is less useful. After all, unless you're in a 5v5, the likelihood of the "double explosion" proccing at all is small. As far as tanking goes, it'll help you in trash fights, but probably not against those big boss baddies.
Glyph of Blood Tap
PvE DPS Grade: B; PvP Grade: B; PvE Tanking Grade: A
I didn't give this glyph a super-high rating because I figure most people are going to use Blood Tap regardless of whether it damages them or not. On the other hand, tanks may find it useful because it's less damage their healer needs to worry about. But personally, I'm on the fence on this one.
Glyph of Death's Embrace
PvE DPS Grade: A while leveling, B at level cap; PvP Grade: B; PvE Tanking Grade: C
Death's Embrace is extremely useful for you ghoul-lovers out there, and should be a key slot of the leveling Unholy DK's glyph page. After level cap though, most players will be weighing whether they want to get a refund on runic power for healing their ghoul, or whether they'd just rather summon a new one after the old one dies and leave this slot for another glyph.
Glyph of Horn of Winter
PvE DPS Grade: A; PvP Grade: B; PvE Tanking Grade: A
For raiding, I think this glyph is critical. In boss fights no one wants to waste a second thinking about renewing Horn of Winter, especially in timed DPS races, where every damage spell counts. Only one DK needs to take this glyph per raid. As far as PvP goes, however, I don't think this is anything special.
Glyph of Pestilence
Grade for all instances: A
Simple fact: DKs do damage by inflicting diseases. Any time you're fighting multiple mobs you'll be using Pestilence, and this glyph just means you'll be hitting targets even if they're farther away, allowing you to manage more dispersed mobs. No brainer.
Glyph of Raise Dead
Grade for all instances: A
Personally, I love this one, since I hate buying Corpse Dust and don't always bring enough to get me through an instance without many humanoid targets. This glyph also means that non-Unholy DKs don't have to worry about spending their hard-earned cash summoning ghouls that only last a couple of minutes.
Join us next time for a look at major glyphs! Happy Trails!
Sunday, December 7, 2008
The Newbie’s Guide to Strand of the Ancients
Just entered your first Strand of the Ancients battleground? Unsure what to do, or why there are huge cannons firing at you, or how to drive those weird tanks? We’ve got you covered.
What is Strand of the Ancients? This battleground is a two-phase timed siege conflict set against the backdrop of an ancient Titan fortress. The Strand is unique in that it features player-driven siege vehicles, much like those used in Wintergrasp, and player-controlled anti-personnel cannons.
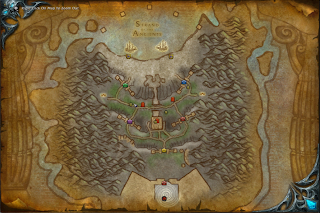
In Phase one, Horde defends the fortress from Alliance attackers. The attackers have a total of nine minutes and 55 seconds to blast their way through the fortress gates and reach the Keep to capture the Titan relic held therein.
In phase two, Horde goes on the offensive while the Alliance defends the fortress. If in phase one the Alliance attackers are able to capture the relic before their time has expired, then their attack time becomes the total time the Horde have in phase two to reach the relic. This means that , like most battlegrounds, timing and strategy are key if your team wants to win.
Step One: Defense
The name of the game here is: Gate Control. There are a total of five outer gates and an inner keep gate in Strand of the Ancients, each of which can be destroyed by the attacking team. You’ll start battle high up on the South Graveyard platform facing the first two fortress gates, which overlook the beach and the arrival of your attackers. Usually, defenders will divide here, sending half their team to one gate and the other half to, well... the other gate. The first players to arrive usually take control of their gate’s turret cannons, while any additional defenders patrol the area.
Without a doubt, the most fun part of being a defender is using the huge antipersonnel cannons which overlook each of the first four fortress gates. Each gate has two cannons, and defenders would be wise to ensure that the cannons at both starting gates are fully-staffed. If you’re the first to reach a cannon, dismount and hop inside. Immediately, your character ability hotbar will be replaced by a hotbar for the cannon itself. There’s only one ability to master here, so spam it to your heart’s content. The cannons also come with a targeting display, which you can use to determine where your next shot will land.
The most important role for a player in control of a cannon is to take down the enemy Demolishers (huge siege vehicles) before they have a chance to break their way through your gate. Both siege vehicles and cannons have a separate health rating than their operators and are disabled first, so upon destroying a Demolisher, make sure you fire some shots into the wreckage to take out the enemy pilot and potential passengers as well. But beware – Demolishers have a long range and are capable of destroying antipersonnel cannons as well as the gates themselves.
Should the enemy break their way through, fire a few parting shots and make your way to the second pair of gates. If at any time a defender is caught on the wrong side of an unbroken gate, they can use the Defender Portals located nearby to teleport to safety.
As the battle moves to the second set of gates, cannon operators should also pay special attention to invaders attempting to take control of the nearby graveyard flags. Once your graveyards have been taken, they cannot be reclaimed. Furthermore, possession of these graveyards also activates the siege workshops nearby, allowing enemy players to bring more Demolishers into the battle, as well as Seaforium Charges, which individual players can use to help destroy gates. The good news is that compared to your antipersonnel cannon, any enemy attempting to take over a flag is relatively weak.
Only one player can use a turret cannon at a time, but fortunately there’s a lot to do when you’re defending, even if you don’t have access to the heavy artillery. In the beginning of the battle, defending players not on cannon duty commonly swarm the beaches, looking to distract Demolisher drivers and take out wandering enemies.
Once the battle reaches the second set of gates, attacking players have access to Seaforium Charges, which are personal bombs used to help destroy the fortress gates. Players bearing Seaforium Charges can usually be identified by their pell-mell run towards the fortress gates, ignoring enemy cannon fire. Defenders not on cannon duty should disarm the Charges as fast as possible to avoid incurring damage to their gate.
The fifth fortress gate does not possess antipersonnel cannons, so defenders here will be required to take on Demolishers hand to... wheel? battering ram? catapult? Demolishers look slow but they can move out of spell range quickly. They also cannot be slowed, frozen or snared. Your best bet in bringing them down is therefore to run behind or alongside them and hit them with the best instant-cast and quick-timed abilities you’ve got. Don’t run directly in front of a Demolisher, as they have a battering ram ability which causes significant damage.
Should enemy attackers break through the fifth gate, defenders should spare no energy in halting their siege on the fortress keep. Attackers have only to click on the Titan relic inside the keep to claim it, and their attack time will become yours unless you can prevent them from gaining access to the keep.
Step Two: Attacking
Your attack starts aboard one of two ships sailing toward the Strand. Attackers, just like defenders, are divided at the start of the phase. Use this time aboard the ship to plan your strategy and determine your Demolisher operators. Both attacking ships will land at separate docks, each of which harbors two Demolishers, which provide the starting artillery to make your first assault on the enemy gates.
When a player takes control of a Demolisher, their task bar is replaced by the abilities bar of the Demolisher itself. These siege engines have two abilities - a long-range catapult shot for taking our enemy gates and turret cannons, and a short-range battering ram for knocking down doors and making melee-range strikes against any enemy players. Like the anti-personnel cannons, Demolishers come with a ranged targeting display to help plan where your shots will land.
Each Demolisher can hold two passengers, and unlike the driver each passenger is free to use their character abilities while riding the siege engine. Passengers are too far away to use melee combat skills, however, so the standard attack philosophy is to have melee fighters drive the Demolishers while players with ranged combat abilities act as passengers.
While they pack a lot of fire power, Demolishers are relatively unwieldy in close-range combat. They are slow to turn, and completely undefended against side or rear attacks. It should therefore be the job of the passengers in any Demolisher to pick off nearby enemies before they can become a nuisance. Should your Demolisher be destroyed by enemy forces, a new one will respawn on the beach, or in any siege workshops your team controls.
Attackers who are not operating a Demolisher have various options during combat. They can run interference, distracting defenders who are trying to take down Demolishers. Should one gate be breached before another, they can sneak around the back of the defending cannon turrets and begin taking down the antipersonnel cannons at melee range with relative impunity. Or, after the first set of gates have been destroyed, they can take over one of the enemy graveyards and begin arming Seaforium Charges – personal bombs found inside the barrels stockpiled outside each workshop.
When running Seaforium Charges, it’s usually best to have company. As the battle moves closer to the keep, defenders become more numerous (and usually more frantic as well), and the chances of them diffusing your bombs become higher. Grab and friend or three and storm a gate together to maximize your chances for damage. Remember that while you must dismount to pick up a Charge, you can mount and ride while carrying one.
While the keep gate and the fortress doors themselves do not have any cannons to protect them, defenders from both sides of the fortress usually converge at this point. This means that both Demolishers and attacking players will find themselves once more in melee range with defenders. Attackers who aren’t piloting or riding Demolishers or running Seaforium Charges must therefore take care to destroy or distract any enemies who are attacking your siege engines. Demolishers remain your best hope of breaking through the fortress gates and capturing the relic.
Interested in learning more about Strand of the Ancients? Join me next time as I take a look at some of the more interesting battleground achievements. Good luck!
What is Strand of the Ancients? This battleground is a two-phase timed siege conflict set against the backdrop of an ancient Titan fortress. The Strand is unique in that it features player-driven siege vehicles, much like those used in Wintergrasp, and player-controlled anti-personnel cannons.

In Phase one, Horde defends the fortress from Alliance attackers. The attackers have a total of nine minutes and 55 seconds to blast their way through the fortress gates and reach the Keep to capture the Titan relic held therein.
In phase two, Horde goes on the offensive while the Alliance defends the fortress. If in phase one the Alliance attackers are able to capture the relic before their time has expired, then their attack time becomes the total time the Horde have in phase two to reach the relic. This means that , like most battlegrounds, timing and strategy are key if your team wants to win.
Step One: Defense
The name of the game here is: Gate Control. There are a total of five outer gates and an inner keep gate in Strand of the Ancients, each of which can be destroyed by the attacking team. You’ll start battle high up on the South Graveyard platform facing the first two fortress gates, which overlook the beach and the arrival of your attackers. Usually, defenders will divide here, sending half their team to one gate and the other half to, well... the other gate. The first players to arrive usually take control of their gate’s turret cannons, while any additional defenders patrol the area.
Without a doubt, the most fun part of being a defender is using the huge antipersonnel cannons which overlook each of the first four fortress gates. Each gate has two cannons, and defenders would be wise to ensure that the cannons at both starting gates are fully-staffed. If you’re the first to reach a cannon, dismount and hop inside. Immediately, your character ability hotbar will be replaced by a hotbar for the cannon itself. There’s only one ability to master here, so spam it to your heart’s content. The cannons also come with a targeting display, which you can use to determine where your next shot will land.
The most important role for a player in control of a cannon is to take down the enemy Demolishers (huge siege vehicles) before they have a chance to break their way through your gate. Both siege vehicles and cannons have a separate health rating than their operators and are disabled first, so upon destroying a Demolisher, make sure you fire some shots into the wreckage to take out the enemy pilot and potential passengers as well. But beware – Demolishers have a long range and are capable of destroying antipersonnel cannons as well as the gates themselves.
Should the enemy break their way through, fire a few parting shots and make your way to the second pair of gates. If at any time a defender is caught on the wrong side of an unbroken gate, they can use the Defender Portals located nearby to teleport to safety.
As the battle moves to the second set of gates, cannon operators should also pay special attention to invaders attempting to take control of the nearby graveyard flags. Once your graveyards have been taken, they cannot be reclaimed. Furthermore, possession of these graveyards also activates the siege workshops nearby, allowing enemy players to bring more Demolishers into the battle, as well as Seaforium Charges, which individual players can use to help destroy gates. The good news is that compared to your antipersonnel cannon, any enemy attempting to take over a flag is relatively weak.
Only one player can use a turret cannon at a time, but fortunately there’s a lot to do when you’re defending, even if you don’t have access to the heavy artillery. In the beginning of the battle, defending players not on cannon duty commonly swarm the beaches, looking to distract Demolisher drivers and take out wandering enemies.
Once the battle reaches the second set of gates, attacking players have access to Seaforium Charges, which are personal bombs used to help destroy the fortress gates. Players bearing Seaforium Charges can usually be identified by their pell-mell run towards the fortress gates, ignoring enemy cannon fire. Defenders not on cannon duty should disarm the Charges as fast as possible to avoid incurring damage to their gate.
The fifth fortress gate does not possess antipersonnel cannons, so defenders here will be required to take on Demolishers hand to... wheel? battering ram? catapult? Demolishers look slow but they can move out of spell range quickly. They also cannot be slowed, frozen or snared. Your best bet in bringing them down is therefore to run behind or alongside them and hit them with the best instant-cast and quick-timed abilities you’ve got. Don’t run directly in front of a Demolisher, as they have a battering ram ability which causes significant damage.
Should enemy attackers break through the fifth gate, defenders should spare no energy in halting their siege on the fortress keep. Attackers have only to click on the Titan relic inside the keep to claim it, and their attack time will become yours unless you can prevent them from gaining access to the keep.
Step Two: Attacking
Your attack starts aboard one of two ships sailing toward the Strand. Attackers, just like defenders, are divided at the start of the phase. Use this time aboard the ship to plan your strategy and determine your Demolisher operators. Both attacking ships will land at separate docks, each of which harbors two Demolishers, which provide the starting artillery to make your first assault on the enemy gates.
When a player takes control of a Demolisher, their task bar is replaced by the abilities bar of the Demolisher itself. These siege engines have two abilities - a long-range catapult shot for taking our enemy gates and turret cannons, and a short-range battering ram for knocking down doors and making melee-range strikes against any enemy players. Like the anti-personnel cannons, Demolishers come with a ranged targeting display to help plan where your shots will land.
Each Demolisher can hold two passengers, and unlike the driver each passenger is free to use their character abilities while riding the siege engine. Passengers are too far away to use melee combat skills, however, so the standard attack philosophy is to have melee fighters drive the Demolishers while players with ranged combat abilities act as passengers.
While they pack a lot of fire power, Demolishers are relatively unwieldy in close-range combat. They are slow to turn, and completely undefended against side or rear attacks. It should therefore be the job of the passengers in any Demolisher to pick off nearby enemies before they can become a nuisance. Should your Demolisher be destroyed by enemy forces, a new one will respawn on the beach, or in any siege workshops your team controls.
Attackers who are not operating a Demolisher have various options during combat. They can run interference, distracting defenders who are trying to take down Demolishers. Should one gate be breached before another, they can sneak around the back of the defending cannon turrets and begin taking down the antipersonnel cannons at melee range with relative impunity. Or, after the first set of gates have been destroyed, they can take over one of the enemy graveyards and begin arming Seaforium Charges – personal bombs found inside the barrels stockpiled outside each workshop.
When running Seaforium Charges, it’s usually best to have company. As the battle moves closer to the keep, defenders become more numerous (and usually more frantic as well), and the chances of them diffusing your bombs become higher. Grab and friend or three and storm a gate together to maximize your chances for damage. Remember that while you must dismount to pick up a Charge, you can mount and ride while carrying one.
While the keep gate and the fortress doors themselves do not have any cannons to protect them, defenders from both sides of the fortress usually converge at this point. This means that both Demolishers and attacking players will find themselves once more in melee range with defenders. Attackers who aren’t piloting or riding Demolishers or running Seaforium Charges must therefore take care to destroy or distract any enemies who are attacking your siege engines. Demolishers remain your best hope of breaking through the fortress gates and capturing the relic.
Interested in learning more about Strand of the Ancients? Join me next time as I take a look at some of the more interesting battleground achievements. Good luck!
Saturday, December 6, 2008
PvP Analysis: Tips for Arathi Basin Weekend

While Wrath of the Lich King brought us the shiny new battleground of Strand of the Ancients, firing cannons and driving siege engines shouldn’t take up all your battleground time. The original battlegrounds offer a quick way to gain some honor, especially if you play them during their holiday weekend. If it’s been awhile since your last Arathi Basin game, take a look at these tips before entering the battleground.
Guard! One player minimum per flag, preferably more. Really, there should never be a reason to break this rule, even at the starting flags of Farm or Stables. Not only does having a guard at every flag help to keep you informed of incoming enemy attacks, having a lookout often deters wandering flag ninjas from taking over your base. All it takes to lose a flag is one enemy – don’t give your opponents the chance.
Call It Out! Don’t let an enemy steal your flag in silence – if someone’s attacking, tell your team! The more information your team has, including the number of players attacking and their levels and classes, the more likely they are to be able to mount a quick defense. But at the very least, a quick “inc LM” can at least let your team know you need help.
Relief! Let’s face it: no one really likes guard duty. Guarding the flag is usually boring compared to the high combat that offensive players get to enjoy. Guards also get very little in the way of honor for protecting rarely-attacked flags. But they have a very important job. Sometimes numbers alone will deter an enemy from attacking a flag. Guards can therefore help your team not so much by seeking out enemy players to kill in the field, but by being pro-active in their flag defense. Nevertheless, guarding is often a thankless occupation, and even the most committed guard has days when they’d rather be out bonking heads than doing stealth detection at the Gold Mine. It’s often a very nice present for a player on offense to relieve a player stuck guarding a flag.
Take a Look. Often defenders are in a unique position to see the battleground at large. Blacksmith and Lumber Mill guards especially should use their vantage points to keep tabs on the battle and to call out incoming enemy parties not only at their own flag, but at other key strategic points. Reports on enemy numbers, on poorly-defended flag-points, and on changes in enemy strategy can give your team the information they need to win. Don’t be afraid to use abilities and items which give you a better perspective on the battle. Hunters have Eyes of the Beast, Tracking, and Eagle Eye. Druids and Rogues have Stealth. Engineers can make an Ornate Spyglass – a remarkable telescopic device which players of any profession can use.
Knockback in the Basin. It seems like everyone’s got a knockback ability these days. From Typhooning druids to mages with Blast Wave to shaman summoning Thunderstorm to hunters and their pets, battleground players should expect to be on the receiving end of knockback abilities on a regular basis from here on out. Anyone who has ever been Mind Controlled by a priest knows that in PvP one of the primary functions of knockback or any ability that allows one player to take control of another is to send one’s opponents careening over the edge of a very tall cliff, thus removing them from combat. In Arathi Basin, the Lumber Mill cliff is a prime spot for just this sort of maneuver. Just be careful not to get too close to the edge, or you might wind up getting knocked off yourself.
Have a happy, safe, and successful Arathi Basin weekend!
Monday, November 17, 2008
Bring Out the Big Guns!
So the new expansion is out, with a whole new continent to explore, dungeons to delve, professions to level, and spells to learn. But what are any of those things, really, compared to the grand, shiny, and let's not forget unbelievably HUGE new battleground, Strand of the Ancients? If there is any reason, besides having to go to work and, well, eat and stuff, why my mage is still at level 71, this battleground is it.
Strand of the Ancients is unlike anything we've seen before in WoW PvP. It is a fast-paced, dynamic timed battle set on the massive backdrop of an abandoned Titan fortress. It's also a place where the innate abilities of mages can serve to help both you and your team a great deal.
The basic premise of the Strand is this: one faction uses bombs and siege vehicles to break their way into the enemy keep and steal the Titan relic there, while the other faction uses guns to hold them off. Each faction gets a chance at attacking and defending, but game time is dynamic: however long it takes for the first attackers to break into the keep in the first round is how long the second attackers have to break in during the second round. At most, games take 20 minutes.
Destroying Demolishers: Demolishers, as they are apparently called (they look like goblin tanks to me) can move out of range of most channeled or long-cast spells. They are also immune to slowing or shackling, so instant-cast abilities are key to disabling them. Ice Lance and Fireblast will help bring one of these engines down. Just make sure you have an Arcane Explosion or Blizzard prepared when the pilot and passengers leap out of their smoldering vehicle.
Defending with the Big Guns: If you fancy yourself a crack shot with a rocket launcher, you can take a stab at defending the gates. Take the Defender's Portals, located to the side of each gate, run into the gatehouse, and hop aboard one of the Antipersonnel Guns inside. From here, you can launch missiles which do a massive amount of damage to both incoming enemy tanks and players themselves. While there isn't anything mage-specific about these guns, they are very fun to use.
Attacking with Demolishers: In the sessions of Strand of the Ancients I've run so far, the generally-accepted rule is that melee players drive the demolishers, while ranged attackers ride as passengers. As a mage, this allows you to use your offensive spells to pick off any enemy attackers trying to destroy your tank. My favorite tactic is to cast Blizzard directly behind the tank's path, therefore slowing anyone traveling behind us. Once near a gate, I target the turret guns. While the guns themselves are hard to destroy, defending players tend to stand on these turrets as well.
Stealth Bombing: Invisibility is an excellent way of sneaking past enemies who might be guarding the machine shops. Stealth, grab one of the seaforium charges held in the barrels outside the machine shop, jump on your mount, and make for the nearest gate. Once there, plant your bomb and head back for more.
Strand of the Ancients is unlike anything we've seen before in WoW PvP. It is a fast-paced, dynamic timed battle set on the massive backdrop of an abandoned Titan fortress. It's also a place where the innate abilities of mages can serve to help both you and your team a great deal.
The basic premise of the Strand is this: one faction uses bombs and siege vehicles to break their way into the enemy keep and steal the Titan relic there, while the other faction uses guns to hold them off. Each faction gets a chance at attacking and defending, but game time is dynamic: however long it takes for the first attackers to break into the keep in the first round is how long the second attackers have to break in during the second round. At most, games take 20 minutes.
Destroying Demolishers: Demolishers, as they are apparently called (they look like goblin tanks to me) can move out of range of most channeled or long-cast spells. They are also immune to slowing or shackling, so instant-cast abilities are key to disabling them. Ice Lance and Fireblast will help bring one of these engines down. Just make sure you have an Arcane Explosion or Blizzard prepared when the pilot and passengers leap out of their smoldering vehicle.
Defending with the Big Guns: If you fancy yourself a crack shot with a rocket launcher, you can take a stab at defending the gates. Take the Defender's Portals, located to the side of each gate, run into the gatehouse, and hop aboard one of the Antipersonnel Guns inside. From here, you can launch missiles which do a massive amount of damage to both incoming enemy tanks and players themselves. While there isn't anything mage-specific about these guns, they are very fun to use.
Attacking with Demolishers: In the sessions of Strand of the Ancients I've run so far, the generally-accepted rule is that melee players drive the demolishers, while ranged attackers ride as passengers. As a mage, this allows you to use your offensive spells to pick off any enemy attackers trying to destroy your tank. My favorite tactic is to cast Blizzard directly behind the tank's path, therefore slowing anyone traveling behind us. Once near a gate, I target the turret guns. While the guns themselves are hard to destroy, defending players tend to stand on these turrets as well.
Stealth Bombing: Invisibility is an excellent way of sneaking past enemies who might be guarding the machine shops. Stealth, grab one of the seaforium charges held in the barrels outside the machine shop, jump on your mount, and make for the nearest gate. Once there, plant your bomb and head back for more.
Friday, August 8, 2008
Spirits of Competition
Want to win one of these?

Then hurry to a battleground for a chance at winning a Spirit of Competition, or your very own Competitor's Tabard. Any BG will do, and you get a tabard win or lose. However, you must win games to be eligible for the Spirit of Competition.
The Spirits of Competition will be visiting the battlegrounds from now to August 24th, before they disappear for another two years. So go out and win yours now!
Happy hunting! Good luck out there!
Subscribe to:
Posts (Atom)

